
The Crochet Candy Kitten Amigurumi Pattern is a delightful, beginner-friendly guide aimed at crafting enthusiasts. It presents clear, step-by-step instructions and is great for making charming, plush kittens. Enjoy handcrafting these lovable toy candy kittens with this special pattern.

Crochet Candy Kitten Amigurumi Pattern
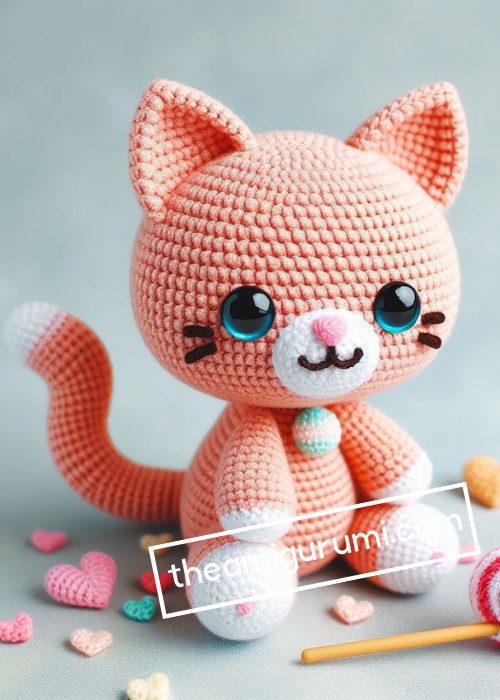
The Crochet Candy Kitten Amigurumi Pattern is a delightful crochet guide for creating an adorable, handmade kitten toy. This crochet pattern is suitable for various skill levels because it is distinguished by its sweet, round face, playful yarn tail, and striking color patterns that resemble candies. The final product is a charming, vibrant toy that effortlessly adds a dash of color and whimsy to any space.

Making Your Crochet Candy Kitten Amigurumi
Materials:
- Yarn:
- Light pink worsted weight yarn for the body and ears
- White worsted-weight yarn for the belly
- Small amounts of black and brown worsted weight yarn for the facial features and tail tip
- Light blue and light green worsted-weight yarn for the candy pieces (optional)
- Crochet hook: 3.5mm or 4mm, depending on your yarn weight and desired amigurumi size
- Safety eyes: 9mm
- Polyester stuffing: For filling the amigurumi
- Yarn needle: For assembling and embroidery
- Black embroidery floss: For eyebrows (optional)
Step by step Pattern
Pattern:
Body:
- Start with the light pink yarn and make a magic ring.
- Crochet 6 single crochets (sc) into the ring.
- Increase in each stitch around (12 sc).
- Continue crocheting around in sc, increasing 6 stitches evenly spaced every other round until you have 36 sc.
- Place a marker at the start of the round.
- Continue crocheting in SC without increasing until the body measures about 3-4 inches tall.
- Start stuffing the body as you crochet.
- Decrease by crocheting two sc together at the end of each round.
- Continue decreasing until you have only 6 sc remaining.
- Stuff the body firmly and close the hole by crocheting the remaining stitches together.
Head:
- Attach the light pink yarn to the top of the body.
- Make 6 sc in a magic ring.
- Increase in each stitch around (12 sc).
- Continue crocheting in sc, increasing 6 stitches evenly spaced every other round until you have 30 sc.
- Place a marker at the start of the round.
- Continue crocheting in SC without increasing until the head measures about 2.5-3 inches tall.
- Start stuffing the head as you crochet.
- Decrease by crocheting two sc together at the end of each round.
- Continue decreasing until you have only 6 sc remaining.
- Stuff the head firmly and close the hole by crocheting the remaining stitches together.
Ears:
- Using the light pink yarn, make a chain of 6 sc.
- Turn and sc in each stitch across.
- Chain 2 and turn. Sc in each stitch across, decreasing at the beginning and end of the row.
- Repeat row 3 until you have 2 sc remaining.
- Close the hole by crocheting the remaining stitches together.
- Repeat steps 1-5 to make a second ear.
Legs:
- Make 4 identical legs by crocheting a chain of 6 sc in light pink yarn.
- Turn and sc in each stitch across.
- Chain 2 and turn. Sc in each stitch across, increasing at the beginning of each row.
- Continue increasing until the leg is the desired length.
- Stuff the leg lightly and close the hole by crocheting the remaining stitches together.
- Sew the legs to the bottom of the body.
Belly:
- Attach the white yarn to the bottom of the body, just below the legs.
- Crochet around the body in sc, increasing as needed to maintain a flat circle.
- Continue crocheting in SC until the belly reaches the desired size.
- Close the hole by crocheting the remaining stitches together.
Assembly:
- Sew the ears to the top of the head, slightly tilted forward.
- Sew the safety eyes to the face.
- Using the black yarn and a yarn needle, embroider a small nose and eyebrows (optional).
- Using the brown yarn, crochet a small chain and sew it to the back of the body for the tail.
- (Optional) Add small candy pieces using the light blue and light green yarn and embroidery floss. You can get creative with the candy shapes and colors!


Leave a Reply