
The Crochet Orange Cat Amigurumi Pattern Free is a fun guide to crafting a vibrant cat toy. Easing all skill levels into the process, it turns basic yarn into an endearing, homemade plaything.
Crochet Orange Cat Amigurumi Pattern:
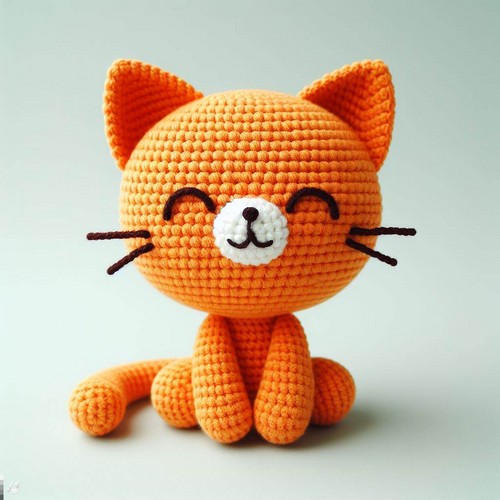
The Crochet Orange Cat Amigurumi Pattern Free is a vibrant display of creativity. Its eye-catching orange hue gives a lively look, while its soft texture invites a soothing touch. The crochet amigurumi features an adorable round body, pointed ears, petite paws, and a curly tail. Detailed facial features, with eyes, a nose, and a cheerful smile, heighten its charm, making this handcrafted piece truly lovable.

Making the Crochet Orange Cat Amigurumi Pattern
Materials:
- Yarn:
- Orange (main color)
- White (belly and paws)
- Black (eyes and eyebrows)
- Pink (nose and inner ears)
- Crochet hook: 3.5mm
- Safety eyes: 9mm
- Fiberfill stuffing
- Tapestry needle
- Scissors
- Stitch marker (optional)
Steps by step Process
1. Head and Body:
- Start with the magic ring. Using orange yarn, make a magic ring and crochet 6 sc into it.
- Increase for the head. Inc in each stitch (12 sc).
- Continue shaping the head. [Sc in 1 stitch, inc] x6 (18 sc). Then, [Sc in 2 stitches, inc] x6 (24 sc).
- Shape the body. Crochet rounds of sc, not increasing, until the body reaches the desired length, which should be slightly longer than the head. Stuff the body and head firmly as you go.
- Round down for the bottom. Once the body has reached the desired length, decrease gradually until you have a small opening at the bottom. Tie off and weave in ends.
2. Legs (make 4):
- Start with a chain. Using orange yarn, chain 6.
- Turn and work in short rows. Sc in the 2nd chain from the hook to turn (5 sc).
- Decrease and round off. Dec, sc in next 2 sts, dec (3 sc). Then, dec, sc in next st, dec (1 sc). Tie off and weave in ends. Repeat for all four legs.
3. Tail:
- Make a chain base. Using orange yarn, chain 6.
- Turn and work in short rows. Sc in the 2nd chain from the hook to turn (5 sc).
- Decrease and round off. Dec, sc in next 2 sts, dec (3 sc). Then, dec, sc in next st, dec (1 sc). Tie off and weave in ends.
4. Assembly:
- Attach the body parts. Sew the body to the head at the base of the neck.
- Add the legs. Sew the legs to the underside of the body, evenly spaced.
- Position the tail. Sew the tail to the back of the body, towards the bottom.
5. Facial features:
- Add the eyes. Sew on the safety eyes.
- Embroider the nose and mouth. Use black yarn for the eyebrows and pink yarn for the nose and inner ears.
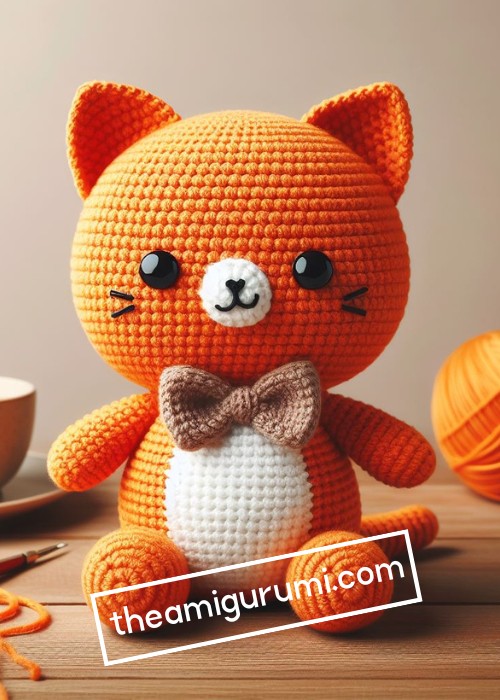
6. Optional details (to match the pictured cat):
- White chest patch: Using white yarn, crochet a small oval and sew it onto the chest.
- Orange stripes: Add thin orange stripes to the body using orange yarn in a slightly lighter shade.
- Bow tie: Make a tiny black or white bow tie and glue or sew it around the neck.

7. Additional tips:
- Feel free to adjust the sizes of the different parts to create your own unique cat.
- Use a stitch marker to mark the beginning of each round, especially when shaping the head.
- Don't be afraid to experiment! The beauty of amigurumi is that you can personalize it to your own style.
By following these steps and adding your own creative touch, you can recreate the charming orange cat from the picture or use it as inspiration to make your own unique amigurumi friend. Have fun crocheting!


Leave a Reply