
The Crochet Mushroom Doll Amigurumi Pattern is a clear guide to making a quirky mushroom doll toy. Ideal for crochet lovers, it offers a delightful crafting session, culminating in a whimsical plushie.

Crochet Mushroom Doll Amigurumi
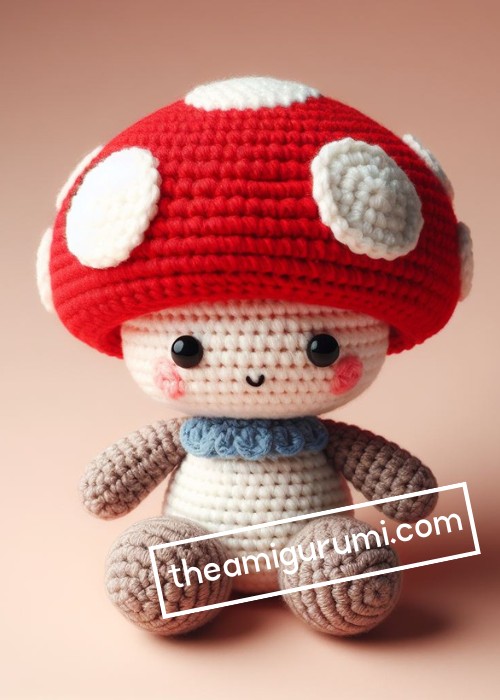
The Crochet Mushroom Doll Amigurumi Pattern results in a whimsical, nature-inspired creation. This design showcases a lovable doll with a mushroom cap hat, expressive eyes, and a charming smile. Fitting in the palm of your hand at about 12cm tall, it features delicate stitchwork on the cap with adorable spots and a contrasting stalk. Targeted at intermediate-level crochet enthusiasts, this mushroom doll becomes a heartwarming handmade toy or a delightful decor piece.

Making The Crochet Mushroom Doll Amigurumi
Sure, here is a step-by-step pattern for crocheting a mushroom doll amigurumi:
Materials:
- Worsted weight yarn in two colors (one for the doll's body and one for the mushroom cap)
- Crochet hook (size H-8 or 5.00 mm)
- Fiberfill
- Yarn needle
- Black embroidery thread (optional)
- Blush (optional)
Step by step Pattern
Body:
- Make a magic ring with the color you chose for the doll's body.
- Crochet 6 single crochets (sc) in the magic ring. Tighten the ring and slip stitch to join.
- Round 2: Increase 6 stitches evenly around, crocheting 2 sc in each stitch. You should now have 12 sc.
- Round 3: Increase 6 stitches evenly around, crocheting 2 sc in each stitch. You should now have 18 sc.
- Rounds 4-12: Crochet 1 sc in each stitch around.
- Round 13: Decrease 6 stitches evenly around, crocheting 2 sc together. You should now have 12 sc.
- Round 14: Decrease 6 stitches evenly around, crocheting 2 sc together. You should now have 6 sc.
- Stuff the body with fiberfill.
- Decrease 3 stitches evenly around, crocheting 2 sc together. You should now have 3 sc.
- Fasten off and weave in the ends.
Head:
- Make a magic ring with the color you chose for the doll's head.
- Crochet 6 sc in the magic ring. Tighten the ring and slip stitch to join.
- Round 2: Increase 6 stitches evenly around, crocheting 2 sc in each stitch. You should now have 12 sc.
- Rounds 3-7: Crochet 1 sc in each stitch around.
- Round 8: Increase 6 stitches evenly around, crocheting 2 sc in each stitch. You should now have 18 sc.
- Rounds 9-11: Crochet 1 sc in each stitch around.
- Stuff the head with fiberfill.
- Round 12: Decrease 6 stitches evenly around, crocheting 2 sc together. You should now have 12 sc.
- Round 13: Decrease 6 stitches evenly around, crocheting 2 sc together. You should now have 6 sc.
- Fasten off and weave in the ends.
Mushroom cap:
- Make a magic ring with the color you chose for the mushroom cap.
- Crochet 6 sc in the magic ring. Tighten the ring and slip stitch to join.
- Round 2: Increase 6 stitches evenly around, crocheting 2 sc in each stitch. You should now have 12 sc.
- Round 3: Increase 6 stitches evenly around, crocheting 2 sc in each stitch. You should now have 18 sc.
- Round 4-11: Crochet 1 sc in each stitch around.
- Round 12: Decrease 6 stitches evenly around, crocheting 2 sc together. You should now have 12 sc.
- Round 13: Decrease 3 stitches evenly around, crocheting 2 sc together. You should now have 9 sc.
- Round 14: Decrease 3 stitches evenly around, crocheting 2 sc together. You should now have 6 sc.
- Round 15: Decrease 3 stitches evenly around, crocheting 2 sc together. You should now have 3 sc.
- Fasten off and weave in the ends.
Assembly:
- Sew the head to the body.
- Sew the mushroom cap to the head.
- If desired, embroider eyes and a mouth on the face using black embroidery thread.
- If desired, add blush to the cheeks using a blush brush.
Tips:
- You can use any color of yarn you like for the doll and the mushroom cap.
- If you use safety eyes, sew them on after you have stuffed the head and before you sew the head to the body.
- You can add hair to the doll by crocheting a few chains and sewing them onto the head.
- You can add arms and legs to the doll by crocheting them separately and sewing them on.


Leave a Reply