
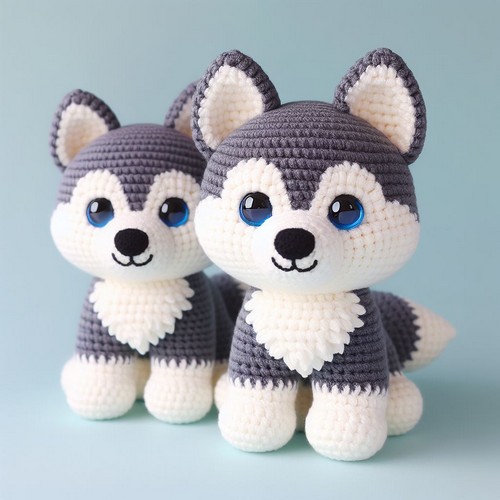
The Crochet Husky Amigurumi Pattern is a straightforward, enjoyable guide for crafting a huggable Husky toy. Appropriate for all, it offers an enjoyable crochet journey, resulting in a cherished handmade pet.
Crochet Husky Amigurumi Pattern
The Crochet Husky Amigurumi Pattern offers a guide to creating a charming husky toy. The pattern emphasizes adorable features such as fluffy fur, expressive eyes, and detailed paws. This exciting crochet venture also promotes crafting skills. On completion, you obtain an attractive Husky, enhancing any toy collection's charm with its lifelike configuration and appealing design elements.
Making the Crochet Husky Amigurumi
Materials:
- Worsted weight yarn in white, black, and gray
- Crochet hook size H-8 (5.00 mm)
- Safety eyes
- Fiberfill
- Tapestry needle
- Scissors
- Stitch marker (optional)

Step by step Pattern
Body:
- Start with the white yarn and make a magic ring.
- Crochet 6 single crochets (sc) in the ring, slip stitch to join.
- Increase by crocheting 2 sc in each stitch around (12 sc).
- Continue crocheting sc around, increasing by 1 sc evenly around each round until you have 30 sc.
- Crochet 15 rounds without increasing.
- Stuff the body firmly with fiberfill.
- Decrease by crocheting 2 sc together around (20 sc).
- Continue crocheting sc around, decreasing by 1 sc evenly around each round until you have 12 sc.
- Cut the yarn, leaving a long tail for sewing.
Legs:
- Make four identical legs using white yarn.
- Start with a magic ring and crochet 6 sc in the ring.
- Increase by crocheting 2 sc in each stitch around (12 sc).
- Continue crocheting sc around, increasing by 1 sc evenly around each round until you have 18 sc.
- Crochet 10 rounds without increasing.
- Stuff the legs firmly with fiberfill.
- Decrease by crocheting 2 sc together around (9 sc).
- Continue crocheting sc around, decreasing by 1 sc evenly around each round until you have 6 sc.
- Cut the yarn, leaving a long tail for sewing.
- Sew the legs to the body.
Tail:
- Make a chain of 20 stitches with white yarn.
- Single crochet back down the chain to create a long, skinny tail.
- Cut the yarn, leaving a long tail for sewing.
- Sew the tail to the body.
Head:
- Change to white yarn.
- Make a magic ring and crochet 6 sc in the ring.
- Increase by crocheting 2 sc in each stitch around (12 sc).
- Continue crocheting sc around, increasing by 1 sc evenly around each round until you have 24 sc.
- Crochet 10 rounds without increasing.
- Stuff the head firmly with fiberfill.
- Decrease by crocheting 2 sc together around (12 sc).
- Continue crocheting sc around, decreasing by 1 sc evenly around each round until you have 6 sc.
- Cut the yarn, leaving a long tail for sewing.
Ears:
- Make two identical ears using white yarn.
- Start with a magic ring and crochet 4 sc in the ring.
- Increase by crocheting 2 sc in each stitch around (8 sc).
- Crochet 5 rounds without increasing.
- Shape the ears by crocheting 3 sc, 2 sc together, 1 sc, 2 sc together, 3 sc around.
- Sew the ears to the head.
Eyes:
- Sew on the safety eyes.
Nose:
- Make a small circle using black yarn.
- Sew the nose to the face.
Mouth:
- The embroidery has a small smile on the face using black yarn.
Face markings:
- Use black yarn to embroider the characteristic husky facial markings, including the eyebrows, eye markings, and muzzle.
Fur details:
- Use gray yarn to embroider small tufts of fur around the face, ears, and legs.
Finishing touches:
- You can add a pink blush to the cheeks using embroidery floss.
- Using black yarn, you can also add a small black collar around the neck.
Your amigurumi husky is now complete!
Here are some additional tips for crocheting amigurumi:
- Use a small crochet hook so that your stitches are tight and your amigurumi will be neat and sturdy.
- Stuff your amigurumi firmly so that it keeps its shape.
- Sew on all the pieces securely so they don't come loose.
- Be creative and have fun!


Leave a Reply