
The Crochet Dwarf Child Amigurumi Pattern is an endearing, straightforward guide for creating a Dwarf Child toy. Open to all, it entails a rewarding crochet experience culminating in a unique handmade figure.

Crochet Dwarf Child Amigurumi Pattern
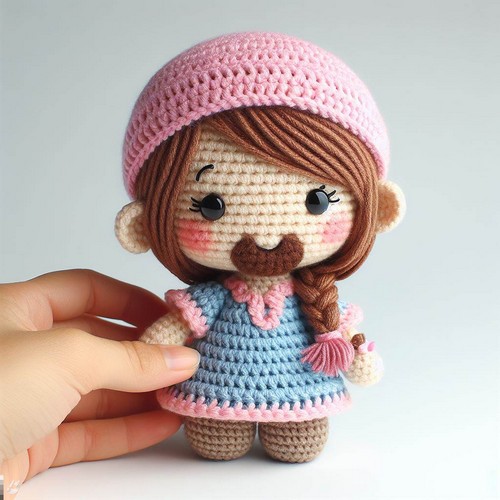
The Crochet Dwarf Child Amigurumi Pattern serves as a guide to make an adorable dwarf child toy. It integrates lovely features like a mini beard, tiny boots, and cheerful facial expressions. The pattern stimulates a fun crochet journey and refines your skills. The final product is a charming Dwarf Child, a characterful addition to any toy collection with its whimsical details reflecting the enchantment of a fairy-tale world.
Making the Crochet Dwarf Child Amigurumi
Materials:
- Crochet hook (size H-8 or 5.00mm)
- Worsted-weight yarn in two colors (one for the skin and one for the beard)
- Polyester stuffing
- Safety eyes
- Tapestry needle
- Scissors

Step by step Pattern
-
Head:
- Start with a magic ring in the skin-colored yarn.
- Crochet 6 single crochets (sc) in the ring.
- Increase by crocheting 2 sc in each stitch around (12 sc).
- Continue crocheting sc around, increasing by 1 sc evenly around each round until you have 30 sc.
- Crochet 10 rounds without increasing.
- Decrease by crocheting 2 sc together around (20 sc).
- Continue crocheting sc around, decreasing by 1 sc evenly around each round until you have 12 sc.
- Stuff the head firmly with polyester stuffing.
- Decrease by crocheting 2 sc together around (6 sc).
- Cut the yarn, leaving a long tail for sewing.
- Sew the tail end of the yarn into the head to close it up.
-
Beard:
- Cut a piece of yarn in the beard color about 6 inches long.
- Fold the yarn in half and loop it around the base of the head, under the stitches.
- Sew the ends of the yarn together to secure the beard.
- You can trim the beard to the desired length.
-
Nose:
- Make a small magic ring with the skin-colored yarn.
- Crochet 6 sc in the ring.
- Stuff the nose lightly with polyester stuffing.
- Decrease by crocheting 2 sc together around (3 sc).
- Cut the yarn, leaving a long tail for sewing.
- Sew the tail end of the yarn into the nose to close it up.
- Sew the nose onto the face of the dwarf.
-
Eyes:
- Sew on the safety eyes.
-
Body:
- Start with a magic ring in the skin-colored yarn.
- Crochet 6 sc in the ring.
- Increase by crocheting 2 sc in each stitch around (12 sc).
- Continue crocheting sc around, increasing by 1 sc evenly around each round until you have 36 sc.
- Crochet 20 rounds without increasing.
- Stuff the body firmly with polyester stuffing.
- Crochet 6 rounds without increasing or decreasing.
- Decrease by crocheting 2 sc together around (24 sc).
- Continue crocheting sc around, decreasing by 1 sc evenly around each round until you have 12 sc.
- Cut the yarn, leaving a long tail for sewing.
- Sew the tail end of the yarn into the body to close it up.
-
Arms:
- Make two identical arms by following the same instructions as for the head, but stopping after round 10 and stuffing them lightly.
- Sew the arms onto the sides of the body.
-
Legs:
- Make two identical legs by following the same instructions as for the body, stopping after round 15 and stuffing them lightly.
- Sew the legs onto the bottom of the body.
-
Hat:
- You can crochet a hat for the dwarf using any hat pattern you like. There are many free hat patterns available online.
-
Accessories:
- You can add any other accessories you like to your dwarf, such as a pickaxe, a shovel, or a lantern.
Once you have completed all the steps, your amigurumi dwarf child will be finished!
Here are some tips for crocheting amigurumi:
- Use a small crochet hook so that your stitches are tight and your amigurumi will be neat and sturdy.
- Stuff your amigurumi firmly so that it keeps its shape.
- Sew on all the pieces securely so they don't come loose.
- Be creative and have fun! You can customize your amigurumi to make it your own.


Leave a Reply