
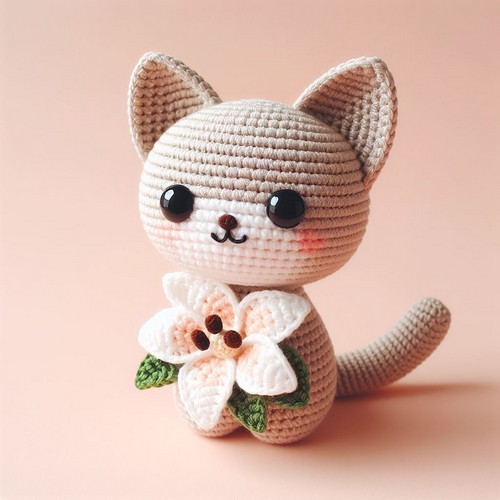
The Crochet Cat Lily Amigurumi Pattern allows you to create a cute, handmade cat. Perfect for crafting lovers, the pattern is straightforward and fun. Make Lily for a gift or a lovely addition to your home decor. Experience the joy of making Lily yourself.
Crochet Cat Lily Amigurumi Pattern
The Crochet Cat Lily Amigurumi Pattern presents Lily, a charming cat figure with eye-catching features. Lily's distinct, soft fur color patterns and adorably whiskered face make her truly endearing. The pattern comprises clear instructions for crafting her cute ears, tiny paws, and curled tail. With its beginner-friendly approach, this amigurumi design is perfect for crochet lovers of various skill levels.
Making Your Crochet Cat Lily Amigurumi
Materials:
- Yarn:
- White yarn for the body, head, and legs
- Pink yarn for the inner ears and flower
- Small amounts of black yarn for the eyes and nose, and green yarn for the flower stem and leaves
- You can also use any other colors you like for the cat and flower
- Crochet hook: Size suitable for your yarn weight (3.5mm recommended for worsted weight yarn)
- Safety eyes
- Fiberfill for stuffing
- Tapestry needle
- Scissors

Step by step Pattern
Body:
- Start with white yarn and make a magic ring.
- Crochet 6 single crochets (sc) into the ring. Tighten the ring closed.
- Round 2: Increase in each stitch around (12 sc).
- Rounds 3-8: Sc in each stitch around (12 sc).
- Rounds 9-13: Increase in each stitch around (24 sc).
- Rounds 14-18: Sc in each stitch around (24 sc).
- Rounds 19-23: Decrease in each stitch around (18 sc).
- Rounds 24-28: Sc in each stitch around (18 sc).
- Round 29: Decrease in each stitch around (12 sc).
- Stuff the body firmly.
- Round 30: Decrease in each stitch around (6 sc).
- Sew the body opening closed.
Legs (make 4):
- With white yarn, chain 8.
- Sc in the second chain from the hook and in each chain to the end. Turn.
- Sc in each stitch across (7 sc).
- Repeat rows 2-3 for a total of 6 rows.
- Stuff the leg lightly.
- Sew the leg closed at the base of the foot.
Head:
- With white yarn, make a magic ring.
- Crochet 6 sc into the ring. Tighten the ring closed.
- Rounds 2-5: Increase in each stitch around (12 sc, 18 sc, 24 sc, 30 sc).
- Round 6: Sc in each stitch around (30 sc).
- Round 7-9: Decrease in each stitch around (24 sc, 18 sc, 12 sc).
- Stuff the head firmly.
- Round 10: Decrease in each stitch around (6 sc).
- Sew the head opening closed.
Ears (make 2):
- With pink yarn, chain 8.
- Sc in the second chain from the hook and in each chain to the end. Turn.
- Sc in each stitch across (7 sc).
- Decrease in the first and last stitch, sc in each stitch between (5 sc).
- Repeat row 4, decreasing by one stitch each time until you have 1 stitch left.
- Fasten off and weave in ends.
Tail:
- With white yarn, chain 20.
- Sc in the second chain from the hook and in each chain to the end. Turn.
- Sc in each stitch across (19 sc).
- Continue crocheting in rows, decreasing by one stitch at each end until you have 1 stitch left.
- Fasten off and weave in ends.
Flower:
- With pink yarn, chain 4 and join to form a ring.
- Sc in each stitch around (4 sc).
- Increase in each stitch around (8 sc).
- Change to green yarn.
- Chain 5, sl st in the second chain from the hook to create a leaf.
- Make 2 more leaves around the ring.
- Fasten off and weave in ends.
Assembly:
- Sew the head to the body.
- Sew the ears to the head, positioning them on the top of the head and tilting them slightly forward.
- Sew on the safety eyes.
- Embroider a small black nose below the eyes.
- Sew the tail to the back of the body.


Leave a Reply