
The Crochet Carrot Bunny Amigurumi Pattern is pure joy, providing an easy step-wise guide to building a precious bunny. Suitable for everyone, it's a rewarding journey to a handmade, delightful result.

Crochet Carrot Bunny Amigurumi Pattern
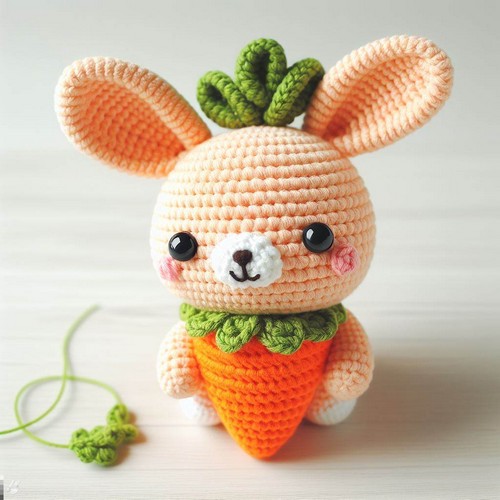
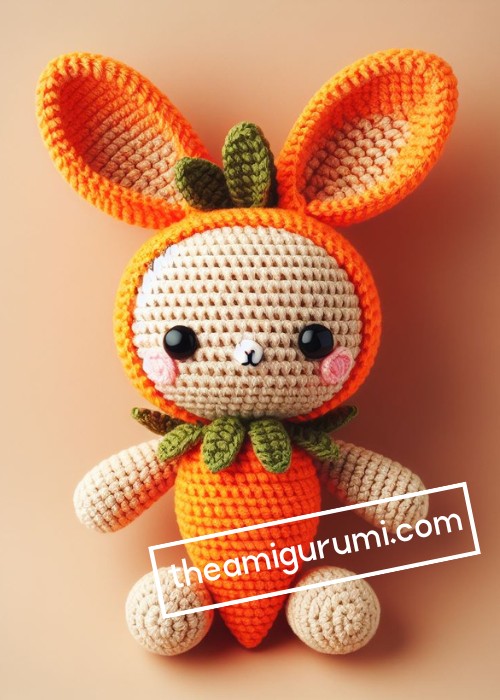
The Crochet Carrot Bunny Amigurumi Pattern allows you to create an adorable bunny clutching its favorite carrot. With charming features such as floppy ears, a sweet expression, and a petite stature, the pattern offers a rewarding project for crochet enthusiasts to sharpen their skills. The result is a delightful Carrot Bunny amigurumi, a perfect cuddly companion that brings joy and whimsy to any toy collection.
Step-by-step Crochet Carrot Bunny Amigurumi
Materials:
- Crochet hook in a size suitable for your yarn (the pattern you choose will specify the hook size)
- Yarn in orange, white, pink, and green
- Fiberfill for stuffing
- Tapestry needle
- Scissors
Making the Body
- Start by making a magic ring with your orange yarn.
- Crochet 6 single crochets (sc) into the magic ring. Pull tight to close the ring.
- Increase by crocheting 2 sc in each stitch around. You should now have 12 sc.
- Continue increasing by crocheting 2 sc in every other stitch around. You should now have 18 sc.
- Continue crocheting around without increasing or decreasing until you have reached your desired body length.
- Stuff the body firmly with fiberfill.
- Decrease by crocheting 2 sc together around. You should now have 9 sc.
- Continue decreasing by crocheting 2 sc together around until you have 6 sc.
- Fasten off and leave a long tail for sewing.
Making the Head
- Make a magic ring with your white yarn.
- Crochet 6 sc into the magic ring. Pull tight to close the ring.
- Increase by crocheting 2 sc in each stitch around. You should now have 12 sc.
- Continue increasing by crocheting 2 sc in every other stitch around until you have 18 sc.
- Continue crocheting around without increasing or decreasing until you have reached your desired head size.
- Stuff the head firmly with fiberfill.
- Decrease by crocheting 2 sc together around. You should now have 9 sc.
- Continue decreasing by crocheting 2 sc together around until you have 6 sc.
- Fasten off and leave a long tail for sewing.
Making the Ears
- Make a magic ring with your white yarn.
- Crochet 4 sc into the magic ring. Pull tight to close the ring.
- Increase by crocheting 2 sc in each stitch around. You should now have 8 sc.
- Continue crocheting around without increasing or decreasing for 3 rounds.
- Decrease by crocheting 2 sc together around.
- Continue decreasing by crocheting 2 sc together around until you have 2 sc.
- Fasten off and leave a long tail for sewing.
- Repeat steps 1-7 to make the second ear.
Making the Carrot
- Make a magic ring with your orange yarn.
- Crochet 6 sc into the magic ring. Pull tight to close the ring.
- Increase by crocheting 2 sc in each stitch around. You should now have 12 sc.
- Continue increasing by crocheting 2 sc in every other stitch around until you have 18 sc.
- Continue crocheting around without increasing or decreasing until you have reached your desired carrot length.
- Stuff the carrot loosely with fiberfill.
- Decrease by crocheting 2 sc together around. You should now have 9 sc.
- Continue decreasing by crocheting 2 sc together around until you have 6 sc.
- Fasten off and leave a long tail for sewing.
Making the Greens
- Chain 5 green sc.
- Single crochet in the second stitch from the hook and in each stitch to the end of the chain. You should have 4 sc.
- Chain 2, turn, and single crochet in each stitch to the end of the chain. You should have 4 sc.
- Slip stitch to the first stitch of the starting chain and fasten off.
Assembly
- Sew the ears to the head.
- Sew the head to the body.
- Sew the greens to the top of the carrot.
- Sew the bunny to the top of the carrot.
- Embroider the facial features using black embroidery floss.


Leave a Reply