
Hop into a fun crochet project with the Crochet Bunny Amigurumi Pattern! This delightful pattern welcomes crafters of all abilities to stitch together a lovable, huggable bunny friend for themselves or their loved ones.

Crochet Bunny Amigurumi Pattern
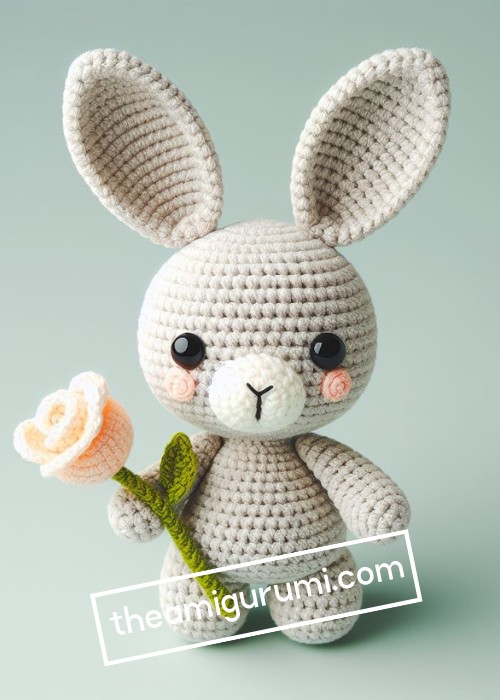
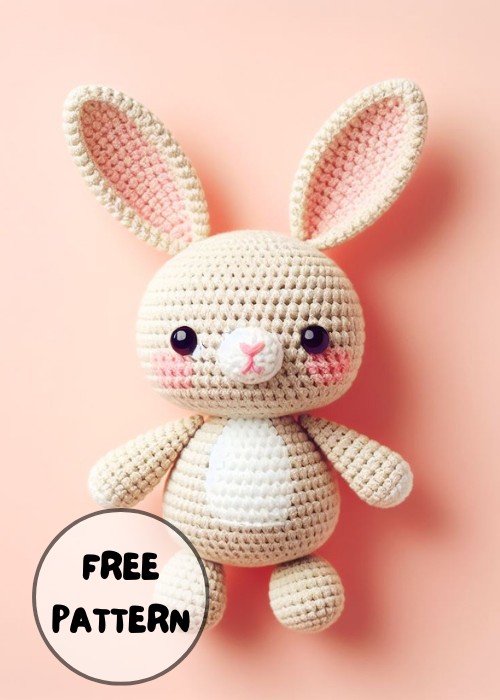
The Crochet Bunny Amigurumi Pattern is an enjoyable guide to fashioning a charming plush bunny. It helps create a round, huggable body with sweet features like large, bright eyes, a tiny, pink nose, and long ears. The pattern includes instructions to form a cute, little tail and delicate paws. When following this guide, the resulting bunny is approximately 20cm in size, mainly crafted from soft, cottony yarn.

Making the Crochet Bunny Amigurumi
Materials:
- Yarn:
- Light pink worsted weight yarn for the bunny
- Orange worsted-weight yarn for the carrot
- Black and white worsted weight yarn for details (eyes, nose, mouth)
- Green worsted-weight yarn (optional) for the carrot leaves
- 3.25mm crochet hook
- Tapestry needle
- Safety eyes (8mm)
- Fiberfill stuffing
Step by step Pattern
Body:
- Start with light pink yarn: Make a magic ring and crochet 6 sc into the ring.
- Increase: Crochet 2 sc in each stitch, for a total of 12 sc.
- Continue crocheting in rounds: Increase 6 sc evenly each round until 36 sc.
- Crochet without increasing: Crochet 6 rounds without increasing.
- Stuffing: Start stuffing the body with fiberfill as you crochet.
- Continue crocheting rounds: Continue crocheting rounds without increasing until the body reaches the desired length, finishing with a decreased round by crocheting 2 sc together in each stitch.
- Tie off and weave in ends.
Head:
- Switch to light pink yarn: Make a magic ring and crochet 6 sc into the ring.
- Increase: Crochet 2 sc in each stitch, for a total of 12 sc.
- Continue crocheting in rounds: Increase 6 sc evenly each round until 24 sc.
- Crochet without increasing: Crochet 4 rounds without increasing.
- Stuffing: Start stuffing the head with fiberfill as you crochet.
- Add eyes: Add safety eyes (or embroider eyes using black yarn).
- Continue crocheting rounds: Crochet 2 more rounds without increasing.
- Decrease: Decrease to 18 sc by crocheting 2 sc together every other stitch.
- Finish off and weave in ends.
Ears (x2):
- Use light pink yarn: Chain 8 stitches.
- Turn and sc in each stitch.
- Decrease: Decrease to 7 sc by crocheting 2 sc together at the end of the row.
- Repeat rows 2-3 until you have 3 sc remaining.
- Finish off and weave in ends.
Arms (x2):
- Use light pink yarn: Chain 12 stitches.
- Turn and sc in each stitch.
- Continue crocheting in rounds, without increasing, until the arm reaches the desired length.
- Finish off and weave in ends.
Legs (x2):
- Use light pink yarn: Chain 15 stitches.
- Turn and sc in each stitch.
- Continue crocheting in rounds, without increasing, until the leg reaches the desired length.
- Finish off and weave in ends.
Tail:
- Use light pink yarn: Chain 10 stitches.
- Turn and sc in each stitch.
- Decrease to 9 sc by crocheting 2 sc together at the end of the row.
- Repeat row 3 until you have 3 sc remaining.
- Finish off and weave in ends.
Carrot:
- Switch to orange yarn: Make a magic ring and crochet 6 sc into the ring.
- Increase: Crochet 2 sc in each stitch, for a total of 12 sc.
- Continue crocheting in rounds: Crochet without increasing until the carrot reaches the desired length.
- Stuff lightly with fiberfill.
- (Optional) Green leaves: Using green yarn, chain 3 stitches and sc in the second stitch from the hook. Repeat to make 3 leaves. Sew the leaves to the top of the carrot.
Assembly:
- Sew the ears to the top of the head.
- Sew the head to the body.
- Sew the arms to the bunny's body, positioning them slightly angled.
- Sew the legs to the body of the bunny, evenly spaced.
- Sew the tail to the back of the body.
- Using black yarn, embroider a small nose and mouth.
- Using white yarn, embroider small cheeks on the face.
- Carrot: Place the carrot in the bunny
More Crochet Bunny Amigurumi Ideas
Rainbow Bunny

Uses: The Rainbow Bunny is more than just a colorful play friend for children! Ideal for special occasions like Easter and baby showers. Its bright colors and soft texture make it a wonderful companion, evoking comfort and sparking.
Materials:
- Aran yarn
- 3.5mm crochet hook
Making: Start by creating a magic ring, then work increases and consistent single crochet (sc) stitches to form the cylindrical shape of the arms. After several rounds of sc, decrease slightly before finishing, stuffing lightly towards the end. The head and Body are crocheted as a single piece, beginning at the head with a magic ring and successive increases to form a sphere. As you work down to create the body, continue the pattern of steady increases and straight rounds, incorporating the arms and legs at the appropriate points. After creating the body, end with decreases and stitch the remaining hole closed, ensuring you've stuffed the body to maintain its shape. Embroider the face and add a pom-pom tail to bring your Rainbow Bunny to life.
Bunny From A Square
Uses: This cuddly toy brings smiles and comfort to little ones, making it a fantastic present. Its simple yet adorable design is much loved, fitting perfectly in tiny hands for big adventures or sweet snuggles.
Materials:
- DK yarn
- 4mm crochet hook
Making: The magic of making this bunny starts with just a square piece. By carefully folding and stitching, it transforms into a charming bunny with ears to love and a body to hug. The beauty of this project is in its simplicity, allowing anyone, even beginner crocheters, to create something special and full of warmth.
Be My Bunny

Uses: Created with movable arms and legs, this little creature is a cuddly companion and an interactive toy for little ones. A bundle of softness and warmth, perfect for gifting on occasions like Easter or a child's birthday.
Materials:
- Bulky yarn
- 4mm crochet hook
Making: Start by cropping a small cylindrical piece with your main yarn color, initially increasing rounds and then decreasing towards the end. Firmly stuffing the little piece as you go along. Next comes the creation of the head and body, which you'll complete as one piece, starting from the top of the head down to the bunny's lower body. For the cute bunny tail, you employ a similar method to the neck insert, starting with an initial magic circle and increasing stitches before decreasing to create a round tail. The assembly process involves several steps. First, you affix the legs by looping through two stitches of the first leg, then through the body's center, and finally, to the second leg. Don't forget the bunny ears; they are sewn on either side of the head for the finishing touch.


Leave a Reply