
Crochet a dazzling Peacock amigurumi using this crochet pattern! Simple stitches & vivid colors yield a unique, charming toy. Great as a gift for bird lovers or kids or as a distinctive piece in any collection.
Crochet Peacock Amigurumi Pattern
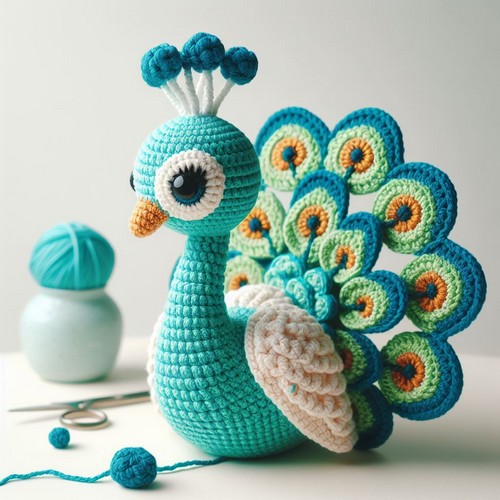
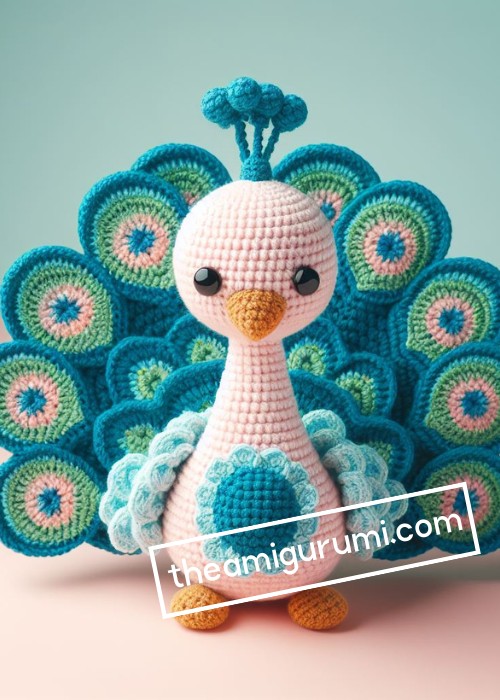
The Crochet Peacock Amigurumi Pattern helps create a striking peacock plushie. Using an array of colorful yarns for its vibrant plumage and a serene blue for its body, this pattern brings forth an expression of unique elegance. Detailed guidance for the body, head, feathers, and tail are included in this easy-to-follow project. It's a charmingly decorative peacock, an absolute standout in any setting.

Making The Crochet Peacock Amigurumi
Materials:
- Body: Worsted weight yarn in blue, green, and purple
- Tail Feathers: Worsted weight yarn in turquoise, teal, and blue-green
- Head & Beak: Worsted weight yarn in brown and yellow
- Crown: Yellow yarn with a bit of sparkle (optional)
- Eyes: Black safety eyes (8mm)
- Stuffing: Polyester fiberfill
- Crochet hook: 2.75mm or 3mm
- Tapestry needle: For sewing and embroidery
- Scissors: For trimming yarn
Step-by-step pattern
Body:
- Start with blue yarn: Make 6 sc in a magic ring.
- Increase to 12 sc (2 sc in each sc).
- Continue crocheting in rounds, increasing 6 sc evenly spaced in each round until you have 36 sc.
- Change to green yarn: Crochet without increasing until the body reaches the desired size.
- Stuffing: Lightly stuff the body with polyester fiberfill as you crochet.
- Decreasing: Begin decreasing by crocheting 2 sc together in each round until you have 6 sc.
- Closing: Cut the yarn, leaving a long tail for sewing. Sew the hole closed to secure the body.
Legs (make 2):
- Repeat steps 1-3 of the body instructions using green yarn to make the first leg.
- Joining: Do not cut the yarn after step 3. Instead, continue crocheting up the side of the body and repeat steps 1-3 again to make the second leg.
- Stuffing and closing: Stuff each leg lightly with fiberfill as you crochet. After finishing the second leg, cut the yarn and sew the opening closed.
Tail Feathers:
- Make 5 separate long chains (around 50-60 chains each) in turquoise, teal, and blue-green yarn.
- Single crochet: Sc back down each chain, working through both loops of the chain.
- Shaping: Miss 1 chain, then sc in the next chain. Repeat this pattern to create a ruffled edge.
- Secure: Tie off each feather yarn and weave in the ends.
Head:
- Brown yarn: Make 6 sc in a magic ring.
- Increase to 12 sc (2 sc in each sc).
- Continue crocheting in rounds, increasing 6 sc evenly spaced in each round until you have 24 sc.
- Stuffing: Lightly stuff the head with polyester fiberfill as you crochet.
- Decreasing: Begin decreasing by crocheting 2 sc together in each round until you have 6 sc.
- Closing: Cut the yarn, leaving a long tail for sewing. Sew the hole closed to secure the head.
Beak:
- Yellow yarn: Make 6 sc in a magic ring.
- Increase to 12 sc (2 sc in each sc).
- Continue crocheting in rounds without increasing until the beak reaches the desired size.
- Closing: Cut the yarn, leaving a long tail for sewing. Sew the beak to the face.
Eyes:
- Sew on two black safety eyes to the face.
Crown (optional):
- Yellow yarn with sparkle: Make a chain of stitches that is the desired circumference of the peacock's head.
- Join the chain to form a ring.
- Crochet in rounds of sc, increasing evenly until the crown reaches the desired height.
- Embellishments: Add small beads or sequins to the crown for extra sparkle (optional).
Assembly:
- Sew the head to the body.
- Sew the legs to the bottom of the body.
- Attach the tail feathers to the back of the body, evenly spacing them out.
- Sew on any additional details, such as eyebrows or eyelashes.
Tips:
- You can use different colors for the yarn to create a unique peacock.
- Be sure to stuff the amigurumi firmly enough to keep it from being floppy but not so tightly that it loses shape.
- You can add wire to the legs and tail feathers to make them poseable.


Leave a Reply