
Crochet delightful memories with our Little Bear Plushies pattern – perfect for cozy decorations, charming gifts, and all crocheting skill levels.
Picture the delight in a child's eyes when they hold a handmade bear plushie, lovingly stitched and bursting with character. The free Little Bear Plushies Pattern offers a straightforward guide to creating adorable bear toys, ideal for treasured gifts or cherished mementos. This pattern employs soft yarn and straightforward stitches, making it accessible for both novice and seasoned crochet fans. With precise instructions and handy tips for maintaining consistent stitch tension, your plushie will emerge flawless and polished.

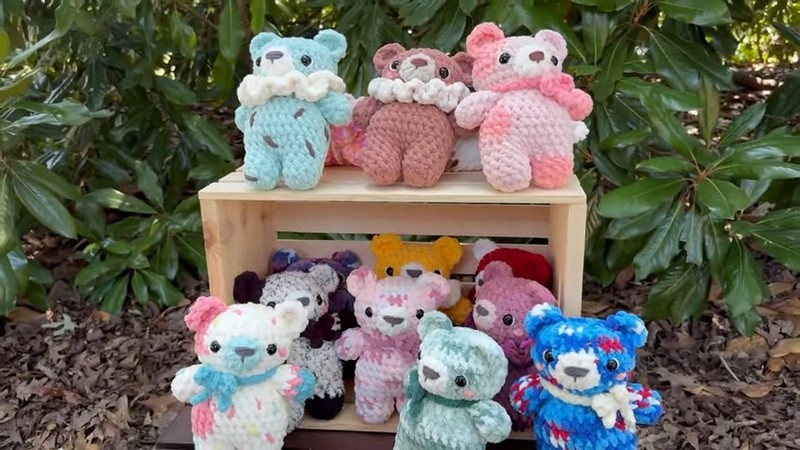
Adorable Little Bear Plushies Pattern
The completed bear can serve as a heartfelt gift, a quaint decoration, or a comforting companion. The tutor's tip accentuates the significance of monitoring your stitches to ensure uniform tension—vital for achieving a professional finish. Enjoy the myriad benefits and the sheer joy of bringing these little wonders to life, one stitch at a time. Each little bear is crafted with soft yarn, capturing the essence of innocence and playfulness. You can customize the bears with different colors and accessories to make each one unique.
How To Crochet Little Bear Plushies
Materials Needed
- Soft blue yarn for the bear
- Sparkly white yarn for the wavy necklace
- Polyfill stuffing
- Scissors
- 6.5 mm inline crochet hook
- Cute stitch markers
- Yarn needle
- Safety eyes
- Cotton worsted weight yarn (for facial details)
Step 1: Crocheting the Arms
- Magic Circle: Start with a magic circle.
- Chain and Single Crochets: Chain one and make eight single crochets into the magic circle.
- Ignore Chain One: Ensure the first single crochet is made into the magic circle, not the chain one.
- Crochet Rounds: Single crochet around for four rows.
- Fasten Off: Slip stitch and fasten off; leave a short tail. Stuff the arms and set them aside.

Step 2: Starting the Feet and Body
- Magic Circle for Feet: Make a magic circle and 11 single crochets.
- Crochet Rounds for Feet: Single crochet into the top of the first single crochet and single crochet for two rows.
- Join Two Feet: For the first foot, cut the yarn after completing, and for the second foot, continue to chain one and join with the first foot using the chain space.
- Be Careful with Legs: Ensure you don't go around the same foot twice to avoid uneven legs.
Step 3: Crocheting the Body
- Row 5: Single crochet in chain spaces and around each foot.
- Row 6: Increase after every five single crochets.
- Single Crochet Rounds: Continue single crochet rounds up to row 9.
- Decreasing for Neck: Decrease after every five single crochets, then four, then three, leading up to the neck area.

Step 4: Attaching Stuffed Arms
- Preparation: Ensure body is stuffed well before attaching arms.
- Position Arms: Attach arms on both sides of the body by single crocheting through the arm and the stitch on the neck.
- Align Arms: Ensure arms are aligned with the body and not skewed.'

Step 5: Crocheting the Head
- Increases for Head: Increase with single and double crochets to create the head shape.
- Single Crochet Rounds: Crochet around for four more rows.
Step 6: Adding Facial Features
- Making a Nose: Create a nose with a magic circle and half double crochets.
- Eyes Placement: Position safety eyes beside the nose to ensure symmetry.
- Adjust for Expression: Adjust eye and nose positions to create the desired expression.
Step 7: Finishing the Head
- Decreasing for Top of Head: Continue decreasing to close the head, ensuring consistent stuffing.
- Sealing: Fasten off with a long tail to sew close any remaining gaps.
Step 8: Attaching Ears
- Making Ears: Create ears with double crochets in a magic circle.
- Sewing Ears: Sew the ears on each side of the head, equidistant from the eyes.
- Alternative Crochet Ears: Alternatively, crochet ears directly onto the head by slip stitching and double crocheting.
Step 9: Adding the Wavy Necklace
- Chain and Double Crochet: Chain 25 (adjust based on bear's neck size) and double crochet three times in each chain.
- Attaching Necklace: Curly queue the strip and sew around the bear’s neck.

Conclusion
Congratulations! You've successfully crocheted your own little bear plushie. This project is great for both beginners and experienced crafters looking for a fun and cute creation. Enjoy your handmade plushie or gift it to someone special.
Tip
To keep your crochet tension consistent, periodically check your stitches and adjust your grip on the yarn. Consistent tension results in a more polished and professional-looking plushie.


Leave a Reply