
Get a free pattern to crochet an adorable Scottish Fold cat amigurumi. It's an easy, fun project for making a soft, plush kitty toy.

Crochet Scottish Fold cat Amigurumi Pattern
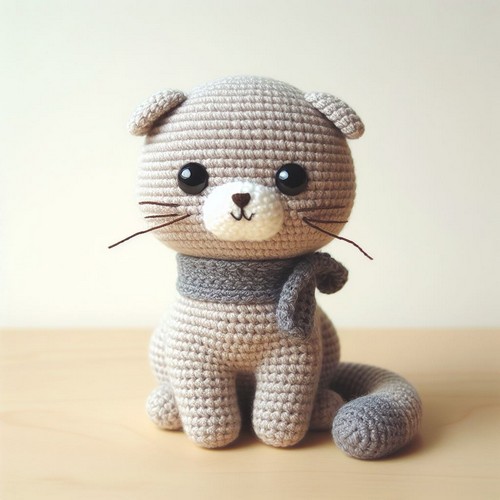
The Crochet Scottish Fold Cat Amigurumi Free Pattern helps crafters create a charming, handmade toy. It mimics the cute, rounded features and distinctive fold-ears of the beloved Scottish Fold cat breed. The pattern is easy to follow, adaptable for color detailing, and perfect for all skill levels. When made, the smallest stitches make it safe and durable for play or display.
Making Your Crochet Scottish Fold Cat Amigurumi
Materials:
- Yarn:
- Main color (for the body and head): light gray
- Contrasting color 1 (for the ears and tail): dark gray
- Contrasting color 2 (for the face): white
- A small amount of black yarn (for the eyes and nose)
- A small amount of pink yarn (for the mouth)
- Hook: Size suitable for your yarn weight (around 2.0mm - 3.0mm)
- Safety eyes: 10mm
- Stuffing: Polyester fiberfill
- Tapestry needle: For sewing the pieces together
- Scissors: For cutting yarn

Step by step Pattern
Body:
- Start with the main color yarn. Crochet 6 single crochets (sc) into a magic ring.
- Increase by crocheting 2 sc in each stitch around. You should now have 12 sc.
- Continue crocheting in rounds, increasing by 6 sc evenly around each round. Crochet for 4-6 rounds, or until the base is as wide as you want the cat's body to be.
- Stop increasing and continue crocheting in rounds without increasing. Crochet for 6-8 rounds, or until the body is as long as you want it to be.
- Stuff the body firmly with fiberfill.
- Decrease by crocheting 2 sc together around. Continue decreasing until you have 6 sc remaining.
- Fasten off and leave a long tail for sewing.
Head:
- Start with the main color yarn. Crochet 6 sc into a magic ring.
- Increase by crocheting 2 sc in each stitch around. You should now have 12 sc.
- Continue crocheting in rounds, increasing by 3 sc evenly around each round for 2 rounds.
- Continue crocheting in rounds, increasing by 6 sc evenly around each round for 2 rounds.
- Continue crocheting in rounds without increasing for 3-4 rounds.
- Start decreasing by crocheting 2 sc together around. Continue decreasing until you have 6 sc remaining.
- Stuff the head firmly with fiberfill.
- Fasten off and leave a long tail for sewing.
Ears (make 2):
- Start with the contrasting color 1 yarn. Crochet 4 sc into a magic ring.
- Increase by crocheting 2 sc in each stitch around. You should now have 8 sc.
- Crochet 3 rounds without increasing.
- Crochet 1 round, decreasing by 1 sc evenly around.
- Fasten off and leave a long tail for sewing.
Tail:
- Start with the contrasting color 1 yarn. Crochet a chain of any length you like.
- Single crochet back down the chain.
- Stuff the tail lightly with fiberfill.
- Fasten off and leave a long tail for sewing.
Legs (make 4):
- Start with the main color yarn. Crochet 6 sc into a magic ring.
- Increase by crocheting 2 sc in each stitch around. You should now have 12 sc.
- Continue crocheting in rounds without increasing for 4-5 rounds.
- Stuff the legs lightly with fiberfill.
- Decrease by crocheting 2 sc together around. Continue decreasing until you have 6 sc remaining.
- Fasten off and leave a long tail for sewing.
Assembly:
- Sew the head to the body.
- Sew the ears to the top of the head.
- Sew the tail to the back of the body.
- Sew on the safety eyes.
- Embroider the nose and mouth with black and pink yarn.
- Sew on the legs.


Leave a Reply